I have added a second rain-cape zeltbahn and now I have a matched set for field use. This double set-up is going to be my regular "bushcraft tent" for my back country adventuring.

Before I get into the meat of this posting, here are a couple of links to my original postings that covers some of the details and history of these amazing zeltbahn rain-capes:
hungarian-m49/82 zeltbahn rain-cape
hungarian M49/82 History
First off, I would like to highly recommend these Hungarian zelts to anyone who would like to add a very traditional piece of survival - camping gear to their field gear. These zelts are cut to the same pattern as the original WW2 versions, but are made with a much lighter and stronger fabric. The fabric itself must be a poly-cotton mix of some sort that has a very high thread count weave. They are treated with a traditional "oilskin" treatment, but lack the nasty "surplus" smell!
I had an afternoon of "field maneuvers" in the backyard so I could field test and fine-tune the two zelt set-up. I worked out the bugs, made a few adjustments, and figured out how I plan to roll and carry the tent on my pack...... it was a very successful day!
 |
| My double-zelt tent with poles, strapped to the bottom of my Frost Ilse Royal Jr. Pack |
Both of my Hungarian zeltbahn rain-capes are in virtually unissued condition. One is from 1989 and the other is dated 1992.

Originally these late model zelts were issued with an expandable aluminum center pole to the Hungarian troops. In the years prior to that, WW2 through the early post-war years, the standard issue Mosin Nagant 91/30 rifle with bayonet was used as the tent pole! Since I was lacking the aluminum pole, but just happened to have an original Mosin Nagant in the shop, I decided to set up one of the zelts with the rifle-pole to determine the propper center pole length.

The Mosin Nagant rifle with the attached bayonet, is exactly the right length to use as the center pole! This definitely confirms that these zelt rain-capes were deigned around the rifle as a center pole set-up. I measured my center pole-rifle height, and then made up a"custom" pole set for my own field use.

I used one standard WW2 issue, Swiss zeltbahn tent pole set, and added a short, fourth length, to bring the assembled pole to the correct length. I also added some additional tent stakes from a couple of other spare Swiss pole sets. The new pole set works perfectly and has that authentic "old-school" look. (fortunately I had one broken Swiss pole that I could use to trim down to the correct length for the 4th pole).

It is very important to have the correct center pole height when you assemble two of these zelts for use as a double tent. If the pole is too short, the perimeter edges will lay flat on the ground. If the pole is two long, you will not be able to insert the pole in it's vertical position with the perimeter corners staked in the correct position. When the pole is the correct length, the tent sides are flat and the bottom edges touch the ground perfectly.
To start the assembly and set up of the double-zelt configuration for a tent, button both zelts together at both edges. This will form the "pyramid" once the center pole is added.

Lay out the tent on the ground and spread it flat, leaving the extra fabric piled and bunched in the middle.

Stake out the corners, but leave the mid-stakes out.
Unbutton the middle portion of the "entrance seam" (leave the bottom buttoned to hold the perimeter shape) and insert the assembled tent pole inside. Run the "point" of the pole into the top grommets and then lift the top up with the pole and then leave the center pole wedged vertically in place.
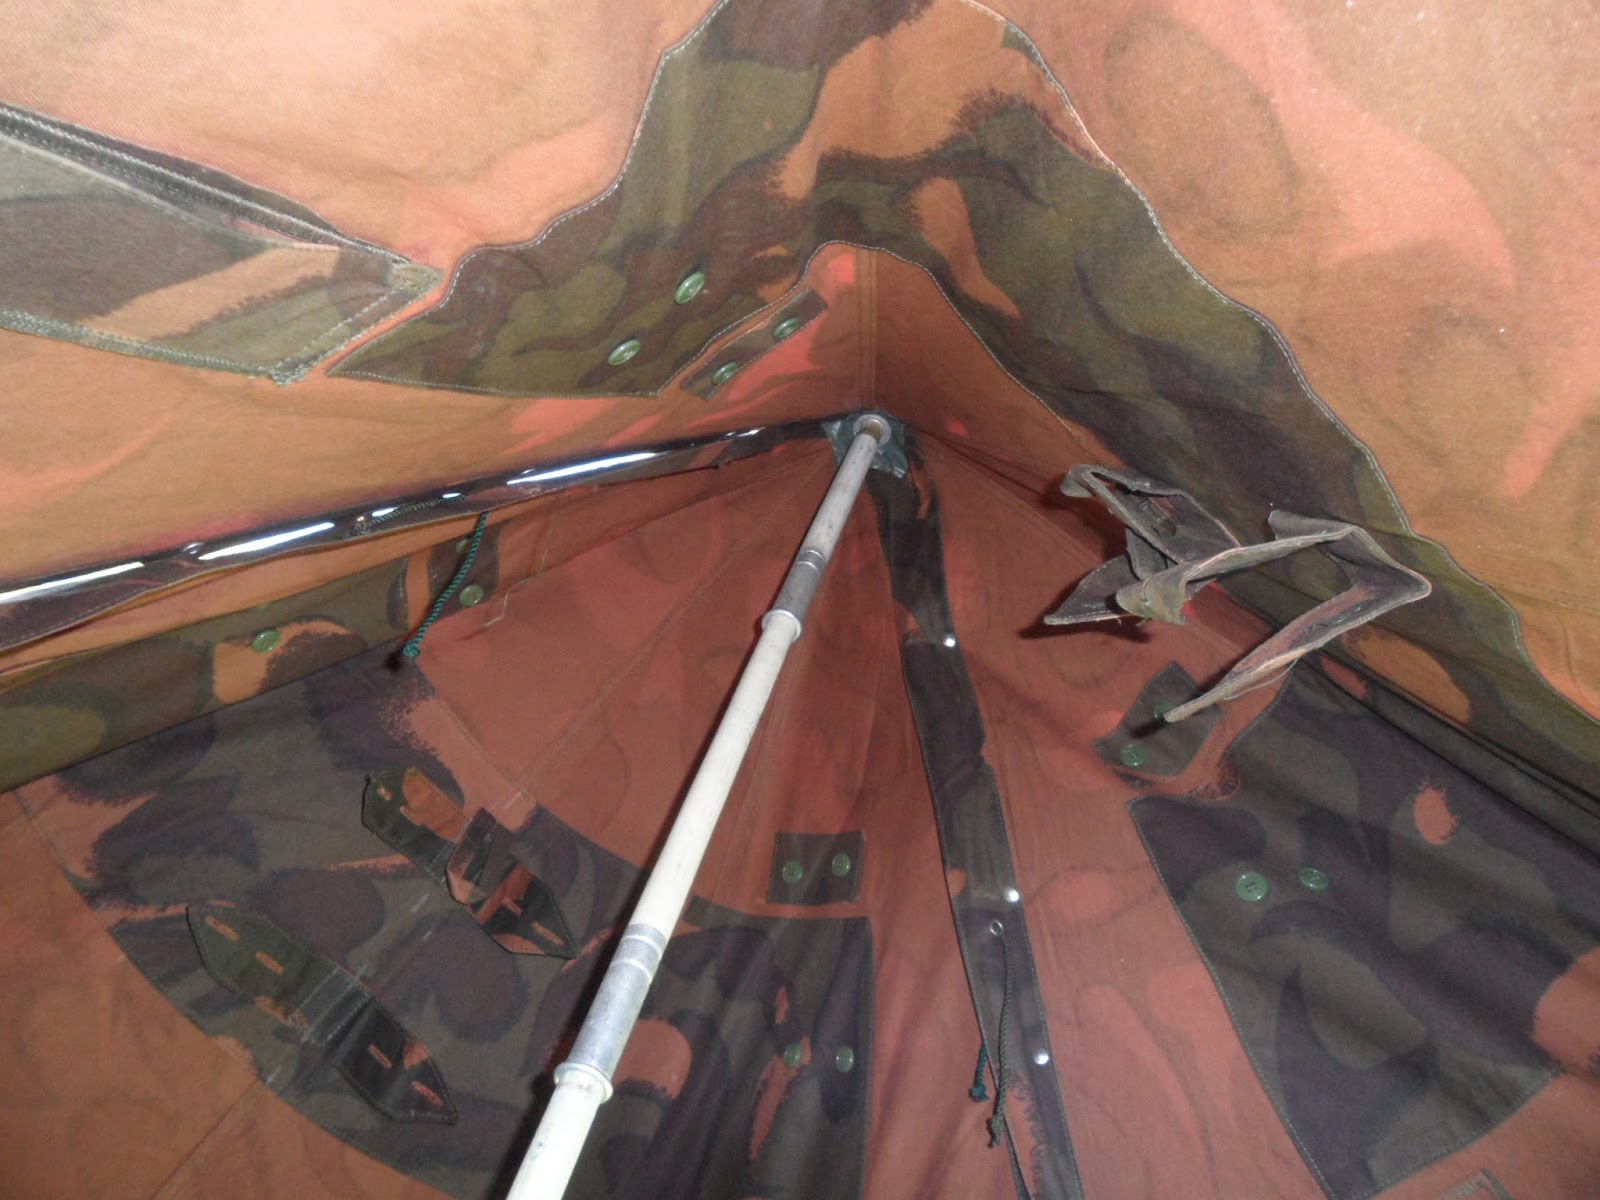
Now you can adjust the corner stakes and then add the mid-edge stakes.

No guy lines or ropes are required to keep the tent erect in this configuration, the stakes do all the work.
If you want to open one edge and fold back the sides to make a lean-to type set up, then you will need to add a single pole line. I have made up one that is the correct length that will span from the top of the pole to the existing corner stake, with the front edges folded back. I spliced an eye in both ends of the custom line to make installation quick and easy.

There are a number of ways you can "open up" the zelt tent after it is set up.........You can lift just one side of the entrance:

You can fold both sides of the entrance back to form a half shelter, or you can just leave the zelt in its pyramid form and use the edge slit as the "door.
With a little bit of experimenting you will see that there are quite a few other options as well. Just be sure to place your helmet or a "pot" over the top of the tent where the tent pole comes through the zelt grommets or you will have a leak in the rain! (That's why you see the soldier's helmets on the top of all the old zelts in the vintage photos!).
To finish things up, here is a photo album of the new Double-Zelt set up.............


I hope this "tutorial" and field exercise helps get a few more of these wonderful Hungarian zelts back in use. If you have the chance to get a couple of them, grab them! You won't be disappointed!
3 comments:
Gotta say that I do enjoy reading your offerings.
I like the way you use the older, less high tech/high $ pieces of kit and are able to modify them 'til they're just right for your needs.
A lesson for us all methinks.
Keep 'em coming!
PhilHB
Thanks for a well presented set of information that I found to be mot useful. I will be using most of your ideas on my 'zeltbahn'
Best wishes
Nigel
Thank you very much for this valuable information and your enthusiasm !
Greetings from Belgium,
Yves
Post a Comment