Well, after over a year, I'm back to the blog!
It's been "one of those years" +. I've been working on some serious research and artifact display - cataloging projects. All of that, and "real life". Did I say it's been one of those years?....................... With all that said, and more not said, I figured I'd get back to the blog with something "simple". So here it is.
I was a firefighter back in the early 1980's, with Butte County Fire Department, and the North Chico Volunteer Fire Department Company 42. I worked out of Station 42 in Chico, California. I filled two positions. Station firefighter as my full time job, and volunteer with Company 42 when I was off duty.
At the time I started in 1982, I was issued some of the OLD, black turnouts along with a "modern" helmet. We later received the "modern" tan turnouts. The issue helmet was the Cairns Brothers helmet of the day. But, what I really dreamed of was a more traditional helmet.
I never ended up with a "traditional" helmet during my fire service time, but I did pick one up several years ago and decided to do a "Veteran's Commemorative Helmet" as a tribute to my time as a firefighter.
I found a new, never issued, Morning Pride, HB2-Plus helmet at a local thrift shop, the helmet was complete, but lacking the front name shield. The price was LOW, and it was the perfect candidate for my envisioned project. It was even the correct color! (Manufacture date of 2001).
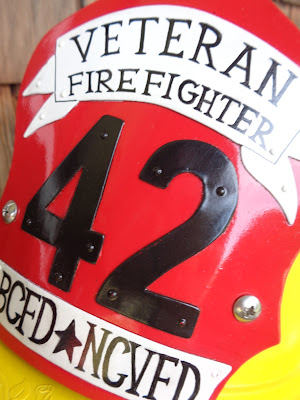
The first task was to design the front shield. I have been working with riveted brass and steel for many years, for restorations and replica creations, so I decided to go with a Detroit Style, metal front shield. Detroit has used metal, as opposed to leather, for many, many years. I did quite a bit of "helmet browsing" online and finally settled on a shield shape and size. Out came the pencil and paper and some trial and error design sketches. When I finally settled on the design layout, I made small patterns of the banners, numbers and shield.
Off to the shop. I cut the pieces out of sheet brass, filed the edges to crisp angles and a finished, rounded edge. The main shield was painted with several coats of exterior "fire engine red" spray paint, and allowed to cure for a few weeks. When the red shield was ready, I drilled and hand rived the banners and numbers to the shield. Since the act of riveting involves "hammer work", I decided to paint the banners and numbers after they were attached. (I think I'd paint first, and touch up after riveting next time!). I carefully masked around the banners and numbers and gave them a few coats of spray paint. When everything was dry and cured, it was time for the lettering.
I lightly penciled on the lettering, and then hand painted the wording with a small brush and black oil-enamel. After everything was dry, I clear-coated it all with clear lacquer, to protect the paint. Since this is basically a display helmet, I wasn't worried about "heat damage", so the painted shield was a good choice.
The finished shield turned out exactly as I had hoped, and even a little better.
After the shield was done, I turned my attention to the chinstrap. The "from-the-factory" chinstrap was made from a fire resistant synthetic webbing. I decided to go with a more traditional leather chin strap. I pulled out some spare harness leather I had in the shop, then cut and riveted up a new strap, using the original hardware. The leather chinstrap really completes the look!
This helmet was originally designed to use a face visor. It had larger "lugs" in the top of the brim where the chinstrap bolted on, for a pivoting visor to attach. I removed the lugs, altered the mounts with a custom shim, and shorter brass machine screws. The resulting "sleek profile" really finished things off.
I still have my original helmet and turnouts, so this "Veteran Helmet" is a great addition, giving me that "before and after" display. A helmet like this is a great way to show your service, and is a long-lasting bit of memorabilia that can be passed down through the family.
So, let's not delay. Here are some photos of the finished helmet and a few of the 1980's original.
Here are a few photos of both helmets, the "Old" and the "New". The first shot is a side-by-side of the two. Original on the left and the "Veteran" on the right.


Exlent display for the Helmet on top of your Bunkers, Boots, Panta with supenders, very traditional of ready next to the rig for a quick response.
ReplyDeleteYour history and you details are aces. Brother DW