Tuesday, May 14, 2024

17 foot Classic Whitehall Boat, The "Snow Goose", Row, Sail, or Motor, John Gardner, "Building Classic Small Craft, Volume 1"

 As many of you may have noticed, I've been absent from the blog for quite a while.  I headed off on a few tangents during the pandemic, one of which is a "new" boat!

After selling the Bernadine, our 1931, Bridge Deck Cruiser, the "big boat" (38 feet), several years ago, I have been watching and hoping for another classic boat to come along.  Actually, I was hoping for something much smaller, but still classic, that could live on a trailer, as opposed to a mooring buoy.  Well, at the start of the pandemic, we spotted one, and in usual form, bought her at first sight!


We call her the "Snow Goose", but her transom carved name is the "Stephanie E.".  There is a faint outline of a snow goose in flight on the transom, which ties into my all-time favorite and loved story, "Snow Goose" by Paul Gallico.  The name "Stephanie E", was given by Dan Jones.  I understand she was originally named after his wife.  We call her Snow Goose.


She was built in Sausalito, California in 1980, by a very well-known boat builder named Dan Jones.  She is built to the lines drawn by John Gardner, in his book "Building Classic Small Craft, Volume 1".  The boat is a composite copy of a typical 19th Century Whitehall.  The sprit sail rig is a direct copy of one Gardener documented that was from an 1870 Boston Whitehall.

The boat is constructed traditionally, with Port Orford Cedar planks, and Black Locust for the keel and ribs.  Completely copper riveted.  No "modern" materials, glues or fasteners were used.  She as traditional as they get!

She found her way to Port Townsend by way of her second owner, and good friend of Dan Jones, when he took an instructors position at the Northwest School of Wooden Boatbuilding.  https://nwswb.edu/

You can read a "history and detail" flier on the boat below for all of the "little details".

When we bought her she was solid, but in need of some immediate attention to get her seaworthy and back on the water.  My first big project was to remove the original centerboard box.  NOT an easy job!  Everything was copper riveted and keel bolted in place......and after working on bolts and rivets that had been in place, in salt water, for something like 40+ years, I ended up with a larger project than I had anticipated!  New keel bolts, new side boards on the box, with salvaged Black Locust frame.  I opted to use bolts, instead of rivets, to reinstall the box (I know, not traditional, but if I have to take it out again, I can!).  Several planks and new rub rails had been installed by students and the Boat School not long before with bought her (dodged a bullet on that one!).  The trailer was OLD, and the wheel bearings were shot ("interesting" ride home!).  We ditched the OLD trailer and bought a new Easy Loader trailer.  Over this last year, I've added and upgraded fittings. re-rigged a few things, built a removable outboard motor mount, and built a forward "Nav-Mast" that we can use when rowing or motoring without the sail rig.

Take-home Day!
 

I could go on and on, but I think I'll just post a gallery of photos I took the other day.  They show her in each of her configurations, row, sail and motor.  As usual, enjoy! (You can click on the photos to display them full-sized)


Tuesday, May 2, 2023

Veteran's Fire Helmet, Custom Morning Pride HB2-Plus, Butte County Fire Department, North Chico Volunteer Fire Department Company 42, BCFD - NCVFD


Well, after over a year, I'm back to the blog!  

It's been "one of those years" +.  I've been working on some serious research and artifact display - cataloging projects.  All of that, and "real life".  Did I say it's been one of those years?....................... With all that said, and more not said, I figured I'd get back to the blog with something "simple".  So here it is.

I was a firefighter back in the early 1980's, with Butte County Fire Department, and the North Chico Volunteer Fire Department Company 42.  I worked out of Station 42 in Chico, California.  I filled two positions.  Station firefighter as my full time job, and volunteer with Company 42 when I was off duty. 


At the time I started in 1982, I was issued some of the OLD, black turnouts along with a "modern" helmet.  We later received the "modern" tan turnouts.  The issue helmet was the Cairns Brothers helmet of the day.  But, what I really dreamed of was a more traditional helmet.  


I never ended up with a "traditional" helmet during my fire service time, but I did pick one up several years ago and decided to do a "Veteran's Commemorative Helmet" as a tribute to my time as a firefighter.

I found a new, never issued, Morning Pride, HB2-Plus helmet at a local thrift shop, the helmet was complete, but lacking the front name shield.  The price was LOW, and it was the perfect candidate for my envisioned project.  It was even the correct color! (Manufacture date of 2001).

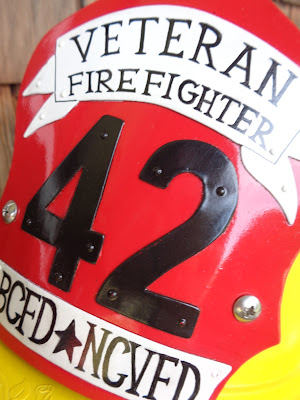
The first task was to design the front shield.  I have been working with riveted brass and steel for many years, for restorations and replica creations, so I decided to go with a Detroit Style, metal front shield.  Detroit has used metal, as opposed to leather, for many, many years.  I did quite a bit of "helmet browsing" online and finally settled on a shield shape and size.  Out came the pencil and paper and some trial and error design sketches.  When I finally settled on the design layout, I made small patterns of the banners, numbers and shield.

Off to the shop.  I cut the pieces out of sheet brass, filed the edges to crisp angles and a finished, rounded edge.  The main shield was painted with several coats of exterior "fire engine red" spray paint, and allowed to cure for a few weeks.  When the red shield was ready, I drilled and hand rived the banners and numbers to the shield.  Since the act of riveting involves "hammer work", I decided to paint the banners and numbers after they were attached.  (I think I'd paint first, and touch up after riveting next time!).  I carefully masked around the banners and numbers and gave them a few coats of spray paint.  When everything was dry and cured, it was time for the lettering.

I lightly penciled on the lettering, and then hand painted the wording with a small brush and black oil-enamel.  After everything was dry, I clear-coated it all with clear lacquer, to protect the paint.  Since this is basically a display helmet, I wasn't worried about "heat damage", so the painted shield was a good choice.

The finished shield turned out exactly as I had hoped, and even a little better.


After the shield was done, I turned my attention to the chinstrap.  The "from-the-factory" chinstrap was made from a fire resistant synthetic webbing.  I decided to go with a more traditional leather chin strap.  I pulled out some spare harness leather I had in the shop, then cut and riveted up a new strap, using the original hardware.  The leather chinstrap really completes the look!


This helmet was originally designed to use a face visor.  It had larger "lugs" in the top of the brim where the chinstrap bolted on, for a pivoting visor to attach.  I removed the lugs, altered the mounts with a custom shim, and shorter brass machine screws.  The resulting "sleek profile" really finished things off.

I still have my original helmet and turnouts, so this "Veteran Helmet" is a great addition, giving me that "before and after" display.  A helmet like this is a great way to show your service, and is a long-lasting bit of memorabilia that can be passed down through the family.

So, let's not delay.  Here are some photos of the finished helmet and a few of the 1980's original.


Here are a few photos of both helmets, the "Old" and the "New".  The first shot is a side-by-side of the two.  Original on the left and the "Veteran" on the right.


Sunday, September 12, 2021

Glock Entrenching Tool, Danish Army M96, Denmark Model 1996, Danmark M/96, Austria, Feltspade

I have been working on filling the various holes in the "Modern Shovels" section of the collection, and I have had one VERY difficult shovel to find (at least here in the US).  I have needed a Glock folding shovel.  Not just any Glock shovel, but one that was actually issued to the Danish Army.

Well I finally found one!  I noticed that one of my favorite surplus sources in Finland had a batch of Glock shovels that were all surplus, and carried the official markings of the Danish Army.  Just what I had been looking for!

Glock has been making and selling their version of the "military grade" folding shovel for 25 years.  They are widely available in sporting goods stores, in nearly every country.  99.9% of these shovels are "Civilian" models, and carry no military markings.  There are a few ex-military Glock shovels out there, but they are quite hard to find these days.

In 1996, The Danish Army adopted the Glock shovel as their official issue entrenching tool.  They were given the classification of  Feltspade M/96.  The shovels that Glock supplied to Denmark were the same as their civilian shovels, with only one difference.  They were stamped with "Danmark M/96" on the blade, below the civilian markings.  Aside from that detail, the civilian shovels are exactly the same.

In the last few years, Denmark surplussed what appears to be the entire "first issue" inventory of their Glock  shovels.  I'm not sure if that means they have adopted another shovel style, or if Glock is continuing to supply their shovels to the Danish Army.  I need to do some more research in that direction.

Before we get into the details of these shovels, I think I'll just put my own personal opinion on these shovels out there.  I have handled all kinds of entrenching tools, from nearly every army, and from nearly every era, and I can say, that in my opinion, these Glock shovels fall far short of "military grade".  They are not very heavy duty, and do not appear that they are built for anything more than casual, moderate digging.  I think that might be why only one country has adopted them in all the years that they have been on the market.  Basically they feel "cheap", and less-than heavy-duty.  Of course this is only my opinion, but if you pick one of these up for true field work, you've been warned!

With all of that out of the way, let's get on to the details.

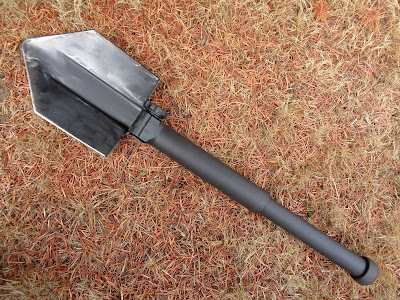
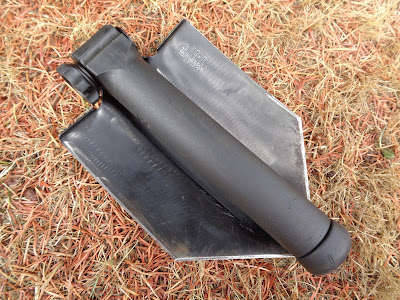
The blade is stamped from a single piece of steel.  There are no other blade parts.  There is not a hinge-reinforcement mount riveted or welded on, just two tabs folded up with holes punched as the hinge.

The handle is completely made of black, polymer plastic.  I am not sure if it is the same material that Glock uses for their pistol frames, or if it is just similar in appearance.  The first section of the handle has the Glock trademark, and "Austria", stamped on one side, and a US patent number on the other side (US.Pat. 4.475.757).


The handle is a two-part, telescoping arrangement.  The second section pulls out and by twisting it counterclockwise, you can "firm-it-up", but not mechanically lock it in place.

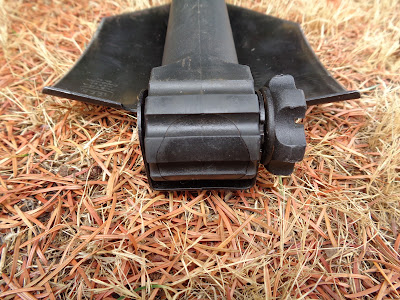
There is a single pin that goes through the handle end and the blade hinge holes.  There is a plastic, threaded tightener knob that is attached to one end of the hinge pin by means of a screw.  The knob is used to lock the blade in it's various positions.

There are four positions that the blade can be locked at.  Each position is determined by a groove in the handle end, that matches a raised ridge on the blade.  The positions are:  Fully Closed, Fully Open, Open to a 25% angle (approximately), and a 45% angle (approximately). 


There is a threaded end cap on the end of the second section of the handle.  When the ring-cap is unscrewed, you can remove a saw blade that is stored inside.  

The saw blade is installed by reinserting it into the end of the handle, sliding the tighter ring over  it, and then screwing it down tight.

The saw blade is a "push saw" blade, and I believe it was designed to cut roots when digging, and was not really intended as a wood saw.  The end of the saw blade is shaped into a flat blade screwdriver.

The screwdriver end of the saw blade is used to remove the screw that secures the tightening knob, or to adjust it's tension.  


The saw blade is also meant to be a leverage tool to loosen the tightening knob if it becomes stuck from over tightening.  To use it to break free the knob, it is placed into the two slots on the knob and then torque is applied.  The flip side of this would be to use the blade to tighten the knob down extra tight, for "military grade digging".

The Danish Army issues these shovels in a plastic "sleeve" that looks like one of the US-NATO style, plastic, tri-fold shovel carriers, but without any attachment clips, loops, etc., on the back.  The Danish web equipment system has a "half-pouch" that is the same type as the UK uses.  The shovel is placed into the plastic sleeve, then into the belt carrier.  I have my eyes out for one of these sleeves and carriers........there is always something to look for!  Here are a few excerpts from the Danish manual showing both the shovel and the carrier pouch.


If you can't find one of the Danish Army sleeves and carrying pouches, then you can use one of the current US entrenching tool pouches, designed for the Gerber shovels.  The Glock shovel fits it perfectly.


As I uncover more information on these Model 96, Danish shovels (aka, Glock shovels), I'll post updates here on this blog post, so check back if you are interested.

Now let's take a closer look at this shovel.